This is an beautiful example of an Epiphone John Lennon signature model that has only been a guitar for about 10 years. It has been played extensively by its owner, and because of his use of a capo, the frets have worn down very quickly. Frets 1 - 8 have deep grooves in them, far too deep to level and re-crown. Contributing to the problem, the fret wire used by Epiphone likely isn't the highest of quality. The Jescar wire we replace it with will last twice as long. So, we'll replace the first eight and then level them into the remaining frets.
Partial re-frets are sometimes a better solution than a full re-fret. Acoustic guitars in particular see a lot of use and wear in the first seven frets of the guitar. What you end up with is some frets that need replacement, and some that are perfectly fine. We only replace what needs to be, saving time and money.
The most important thing here is to make the new frets blend in perfectly with the existing ones. If I were to completely re-fret this guitar, I would be able to bevel and shape the ends of the frets in my own style. Instead, we will mimic the technique used by the factory. Once finished, there will be no visible difference between our work and theirs.
Partly due to the large amount of gunk and dirt built up under the frets, they come out without much trouble. The green residue that you often see on fret boards is actually dried concentrated sweat. Gross yes, but once heated it turns back to a liquid and becomes quite helpful. Still, I run a small bit of oil along the fret, then heat it with a customized soldering gun. When the oil/sweat mixture bubbles up I know that the fret is hot enough, and I can then use my modified carpenters pliers to pull it out.

With the frets removed, I will clean the slots and sand the board. There is an amount of gunk built up here, as well as some grooves worn from playing. With a light sanding, this will all disappear.
Since this guitar has a bound fingerboard, it is very important to remove all debris from the fret slots. Even a tiny bit of leftover glue or dust can be enough to push against the binding and cause a crack while hammering in the frets. This Japanese pull saw is perfect for removing material and cleaning up the slot.

I check the radius of the fingerboard and it's 10". I'll use a 10" radius sanding block with 320 grit paper to clean the board. If this were a full re-fret, I would likely start with 250 grit paper, and go all the way up to 600 or even 1000. Rosewood really shines up nice when sanded with a fine grit, but since its a partial re-fret I don't want this section of the fingerboard to look drastically different than the rest.
You can see here even after a brief sanding, this area appears lighter in color. That's okay, once I clean the rest of the board with steel wool and oil it, it will all look the same.
The fret wire is undercut just so that it occupies as much of the slot as possible, while never pushing against the binding. This is a very important step that can be the difference between a beautiful re-fret and a complete disaster.
And we're ready to glue, hammer, and clamp. (Kinda like gym, tanning, laundry but different..) These fret slots were pretty large so the new wire had to be crimped to fit. I use a special set of pliers to crimp them until they fit as snugly as needed.
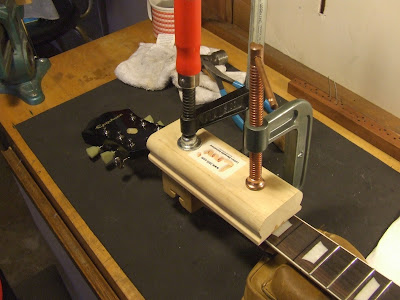
Here are the first 5 frets hammered and glued, waiting to be clamped. I leave the fret ends slightly long at this stage so that my clamping caul will make good solid contact with the frets as the glue dries. The caul can only cover around 7 frets in this area of the fingerboard, so I'll have to do this in two passes.
We'll leave this clamped up for about four to six hours. Then we'll repeat the last step for the remaining three frets. Gluing and clamping the frets has become the standard procedure in our shop. Ideally, the frets should seat properly when only hammered in, but the glue ensures that nothing can shift and everything stays in its right place! Consider it fret insurance.
In the next episode, we'll see the OTHER side of fret replacement. I will level the fret ends, bevel them, blend the new frets into the old ones, crown em, shape the fret ends, then buff and polish them. A quick saddle adjustment and a new set of strings will be all this guitar needs!


No comments:
Post a Comment